命令模式

一个遥控器问题

假设我们有一个遥控器,这个遥控器上有多组的开关按键,每组按键对应着一个卡槽,卡槽是可编程的,能够控制一个电器。而我们有很多的电器,那么我们应该怎样设计这个遥控器呢?

CommandPattern

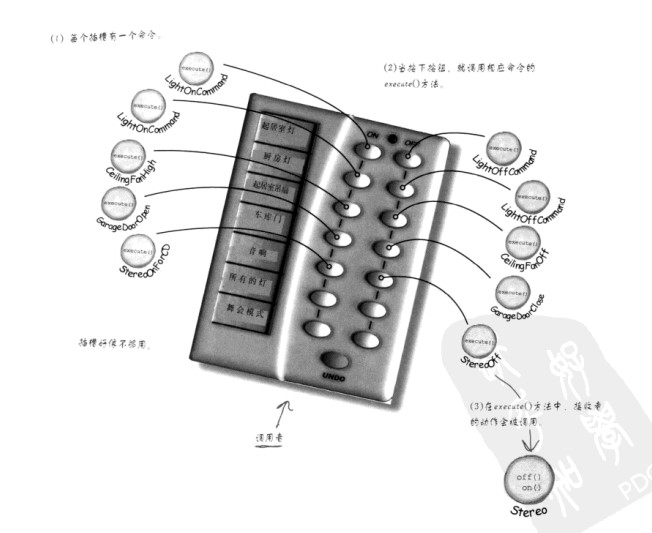
一个无脑的方法当然就是对于每个卡槽,我们直接设置它为指定电器的开关。

1
2
3
4
5
6
7
8
9
10
11
12
13
14
15
16
17
18
19
public class SimpleRemoteControl {
Light light;
TV tv;
public SimpleRemoteControl() {
light = new Light();
tv = new TV();
};

public void buttonPressed() {
light.on();
tv.on();
}
}
public class naiveRemoteContrelTest {
public static void main(String[] args) {
SimpleRemoteControl remote = new SimpleRemoteControl();
remote.buttonPressed();
}
}

代码归档位置如下:
https://github.com/changyuanchn/DesignPattern/tree/main/src/com/changyuan/CommandPattern

但是这样做有什么问题呢?最大的问题就是可扩展性。假设我们需要更换设备呢?就需要更改SimpleRemoteControl方法,这必然违背了我们的对修改关闭,对扩展开放的原则。

那么我们有什么方式将其分离呢?这里引入命令模式

命令模式

命令模式将“请求”封装成对象,以便使用不同的请求、队列或者日志来参数化其他的对象。命令模式也支持可撤销的操作

什么意思呢?我们看上面的代码,这里面light/tv都是具体的对象,从前面的设计模式经验知识我们知道,对付这种,明显可以用接口来解决。可以light/tv/……等等的这些可以抽象出公共的什么接口呢?实际上我们用到了这些类实例对象了么?没有。用到的是他们的开关命令,所以我们可以抽象出command接口,然后创建具体的light类的请求command,然后将light实例对象传递给light类的请求command(在这个请求command中,实际使用的light类里面的开关操作)。这样我们的遥控器就不需要关心具体的类实例了,只需要调用command中的方法就可以了。

1
2
3
4
5
6
7
8
9
public class Light {
public void on () {
System.out.println("Light on!");
}

public void off () {
System.out.println("Light off!");
}
}
1
2
3
4
5
6
7
8
9
10
11
12
13
14
15
16
17
18
19
20
21
22
23
24
25
26
27
28
public interface Command {
public void execute();
}

public class LightOnCmd implements Command {
Light light;

public LightOnCmd(Light light) {
this.light = light;
}

public void execute() {
light.on();
}
}

public class SimpleRemoteControl {
Command slot;
public SimpleRemoteControl() {};

public void setCommand(Command cmd) {
slot = cmd;
}

public void buttonPressed() {
slot.execute();
}
}
1
2
3
4
5
6
7
8
9
public class SimpleRemoteContrelTest {
public static void main(String[] args) {
SimpleRemoteControl remote = new SimpleRemoteControl();
Light light = new Light();
LightOnCmd lightOn = new LightOnCmd(light);
remote.setCommand(lightOn);
remote.buttonPressed();
}
}

这是一个以light为例子的简单的打开按钮操作。我们创建了SimpleRemoteControl,它只关系请求。而我们的请求LightOnCmd只跟light有关。而SimpleRemoteControl中的buttonPressed操作,只需要调用Command的execute函数就可以了,具体的execute的调用关系就由子类自己处理了。

代码归档路径如下:
https://github.com/changyuanchn/DesignPattern/tree/main/src/com/changyuan/CommandPattern/simpleRemoteControlDemo

下面我们扩展上面的应用,我们给遥控器增加多个卡槽,以便于遥控器控制多个设备,然后增加关操作。

首先创建相应的设备

1
2
3
4
5
6
7
8
9
10
11
12
13
14
15
16
17
18
19
20
21
22
23
24
25
26
27
28
29
30
31
32
33
34
35
public class Light {
String name;

public Light () {};

public Light(String name) {
this.name = name;
}

public void on () {
System.out.println(this.name + " light on!");
}

public void off () {
System.out.println(this.name + " light off!");
}
}

public class Stereo {
public void on () {
System.out.println("Stereo on!");
}

public void off () {
System.out.println("Stereo off!");
}

public void setCD () {
System.out.println("Set CD!");
}

public void setVolume (int volume) {
System.out.println("Turn Volume to " + volume + "!");
}
}

然后创建相应的命令

1
2
3
4
5
6
7
8
9
10
11
12
13
14
15
16
17
18
19
20
21
22
23
24
25
26
27
28
29
30
31
32
33
34
35
36
37
38
39
40
41
42
43
44
45
46
47
48
public class LightOnCommand implements Command {
Light light;

public LightOnCommand(Light light) {
this.light = light;
}

public void execute() {
light.on();
}
}
public class LightOffCommand implements Command {
Light light;

public LightOffCommand(Light light) {
this.light = light;
}

public void execute() {
light.off();
}
}

public class StereOffWithCDCommand implements Command {
Stereo stereo;

public StereOffWithCDCommand(Stereo stereo) {
this.stereo = stereo;
}

public void execute() {
stereo.off();
}
}

public class StereOnWithCDCommand implements Command {
Stereo stereo;

public StereOnWithCDCommand(Stereo stereo) {
this.stereo = stereo;
}

public void execute() {
stereo.on();
stereo.setCD();
stereo.setVolume(1024);
}
}

然后设置控制器

1
2
3
4
5
6
7
8
9
10
11
12
13
14
15
16
17
18
19
20
21
22
23
24
25
26
27
28
29
30
31
32
33
34
35
36
37
38
public class RemoteControl {
Command[] onCommands;
Command[] offCommands;

public RemoteControl() {
onCommands = new Command[7];
offCommands = new Command[7];

Command noCommand = new NoCommand();
for (int i = 0; i < 7; i++) {
onCommands[i] = noCommand;
offCommands[i] = noCommand;
}
}

public void setCommand(int slot, Command onCommand, Command offCommand) {
onCommands[slot] = onCommand;
offCommands[slot] = offCommand;
}

public void onButtonWasPressed(int slot) {
onCommands[slot].execute();
}

public void offButtonWasPressed(int slot) {
offCommands[slot].execute();
}

public String toString() {
StringBuffer stringBuffer = new StringBuffer();
stringBuffer.append("\n----------Remote Control------\n");
for (int i = 0; i < 7; i++) {
stringBuffer.append("[slot " + i + "]" + onCommands[i].getClass().getName() + " "
+ offCommands.getClass().getName() + "\n");
}
return stringBuffer.toString();
}
}

测试代码如下:

1
2
3
4
5
6
7
8
9
10
11
12
13
14
15
16
17
18
19
20
21
22
23
24
25
26
27
28
29
30
31
32
33
34
public class RemoteLoder {
public static void main(String[] args) {
RemoteControl remoteControl = new RemoteControl();

// 将所有的装置放到合适的位置上
Light livingRoomLight = new Light("Living Room");
Light kitchenLight = new Light("Kitchen");
Stereo stereo = new Stereo();

LightOnCommand livingRoomLightOn = new LightOnCommand(livingRoomLight);
LightOffCommand livingRoomLightOff = new LightOffCommand(livingRoomLight);

LightOnCommand kitchenLightOn = new LightOnCommand(kitchenLight);
LightOffCommand kitchenLightOff = new LightOffCommand(kitchenLight);

StereOnWithCDCommand stereOnWithCDComand = new StereOnWithCDCommand(stereo);
StereOffWithCDCommand stereOffWithCDComand = new StereOffWithCDCommand(stereo);

remoteControl.setCommand(0, livingRoomLightOn, livingRoomLightOff);
remoteControl.setCommand(1, kitchenLightOn, kitchenLightOff);
remoteControl.setCommand(2, stereOnWithCDComand, stereOffWithCDComand);

System.out.println(remoteControl);

remoteControl.onButtonWasPressed(0);
remoteControl.offButtonWasPressed(0);

remoteControl.onButtonWasPressed(1);
remoteControl.offButtonWasPressed(1);

remoteControl.onButtonWasPressed(2);
remoteControl.offButtonWasPressed(2);
}
}

相对比最初的代码,增加了多个控制器,同时实现了关的操作。
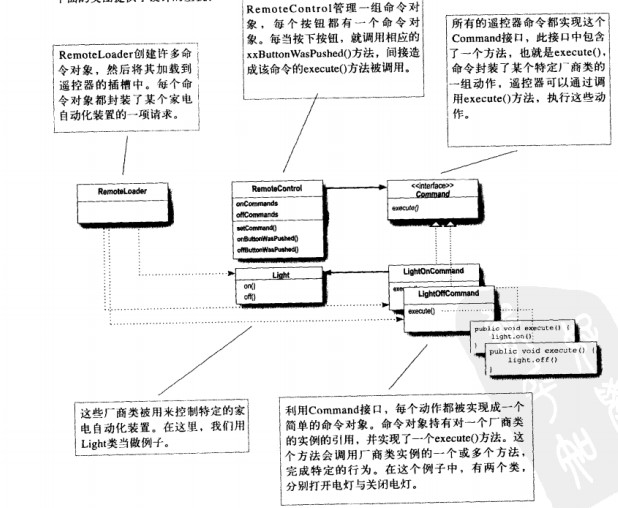
代码归档路径如下:
https://github.com/changyuanchn/DesignPattern/tree/main/src/com/changyuan/CommandPattern/remoteControlDemo

设计图

CommandPattern1

添加撤销操作

这个实现比较简单,需要在Command接口中增加undo方法,然后Command子类实现这个方法,当undoButtonPressed时候,调用undo方法即可。跟上面添加开关的方法逻辑是一致的。

1
2
3
4
public interface Command {
public void execute();
public void undo();
}

增加一点难度:使用状态实现撤销

对于电灯的应用,就两个状态,要么开要么关,这个实现撤销是很容易的。但是如果一个设备有多个状态,这个要实现撤销就没那么容易了。

在上面代码上实现小改动就可以了。

代码如下:

https://github.com/changyuanchn/DesignPattern/tree/main/src/com/changyuan/CommandPattern/remoteControlAddUndoDemo

再增加一点难度,我们要求一个按键可以同时打开所有的设备

代码如下

https://github.com/changyuanchn/DesignPattern/tree/main/src/com/changyuan/CommandPattern/remoteControlParty

命令模式的更多用途

队列请求
日志请求

显示 Gitment 评论