光栅化的步骤会将三角形的线段映射到图像上。但是由于数字图像的不连续性,导致我们没有办法用模拟信号的方式连续的表示直线。实际上是使用小方格,也就是像素来表示直线的颜色,如下面所示。
当线段落在了像素上时,这个像素就染色,没有落在像素上,像素不染色,这就会导致右边的锯齿效果。当图像分辨率较高时,锯齿效果不明显,当分辨率很低时,锯齿效果会比较明显。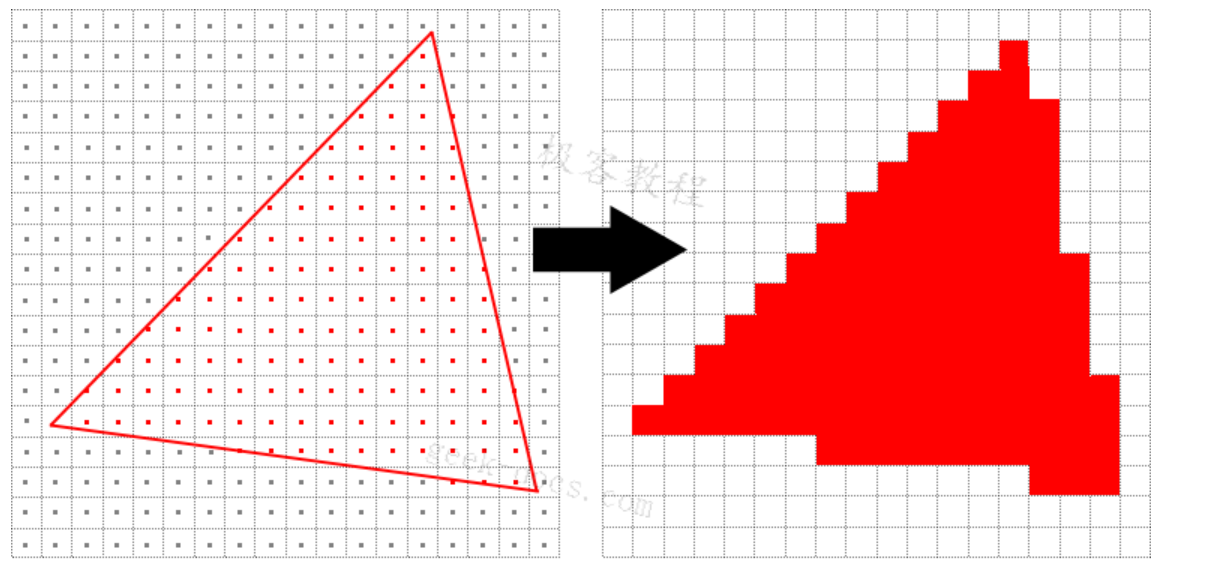
那么有没有什么方法能优化这个显示问题呢?这里我们看到上面的的染色逻辑是我们在每个小方格内采样一个点,这个点在三角形内,整个方格就染色,不在就不染色。之所以会造成锯齿的效果,就在于临近的颜色变化剧烈,会给人眼睛造成冲击,导致人眼能清晰感受到锯齿效果。
那么怎样让其变化不剧烈呢?我们可以增加采样点,每个小方格内采样4次,每次得到一个颜色,然后小方块的颜色是4次的平均。便捷的模糊自然的会导致变化不剧烈,可以欺骗人的眼睛。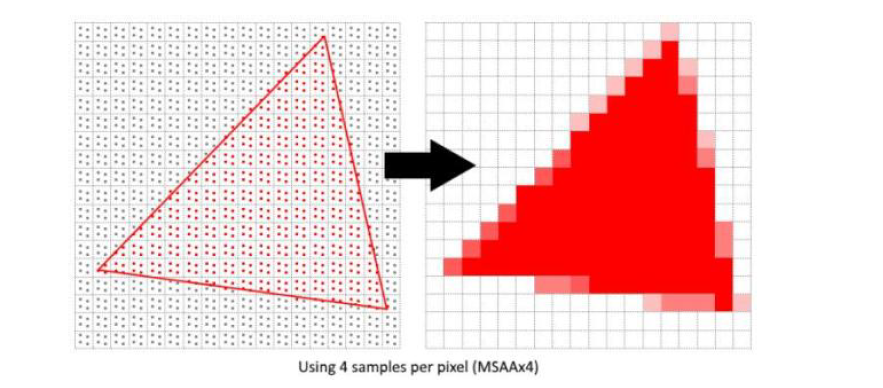
多重采样的原理就是这样的,由于增加了采样次数,必然会带来效率和功耗的提升。
在vulkan中应用多重采样,需要如下的步骤:
查询设备支持的最大的采样数
创建多重采样的colorImage
修改depthImage支持多重采样
将colorImage作为attachment添加到FrameBuffer中
在pipeline中开启多重采样
1)查询设备支持的最大采样数
1 | VKAPI_ATTR void VKAPI_CALL vkGetPhysicalDeviceProperties( |
我们要设置的采样数不能大于这个属性值。
2)创建多重采样的color Image
多重采样是在离屏采样,然后将缓冲区呈现给屏幕。新的缓冲区不同于默认的swapchainImage,这是因为我们要保存每个像素的多个样本。因此我们要创建新的颜色图像资源。1
VkSampleCountFlagBits msaaSamples = VK_SAMPLE_COUNT_1_BIT; // 定义
1 | VkImage colorImage; |
新建一个函数createColorResources,用于创建颜色图像资源。1
2
3
4
5void createColorResources() {
VkFormat colorFormat = swapChainImageFormat;
createImage(swapChainExtent.width, swapChainExtent.height, 1, msaaSamples, colorFormat, VK_IMAGE_TILING_OPTIMAL, VK_IMAGE_USAGE_TRANSIENT_ATTACHMENT_BIT | VK_IMAGE_USAGE_COLOR_ATTACHMENT_BIT, VK_MEMORY_PROPERTY_DEVICE_LOCAL_BIT, colorImage, colorImageMemory);
colorImageView = createImageView(colorImage, colorFormat, VK_IMAGE_ASPECT_COLOR_BIT, 1);
}
这里面的逻辑和纹理图像创建一样的流程,我们需要注意的是他的参数。1
void createImage(uint32_t width, uint32_t height, uint32_t mipLevels, VkSampleCountFlagBits numSamples, VkFormat format, VkImageTiling tiling, VkImageUsageFlags usage, VkMemoryPropertyFlags properties, VkImage& image, VkDeviceMemory& imageMemory);
mipLevels 这里我们设置为1,这是因为我们不是用作纹理图像,所以不需要mipMap的设置,所以这里只要1个细化级别就行,实际上vulkan也要求多重采样的mipLevels要设置为1
numSamples 采样次数,这里需要我们自己设置,这个值不能大于device支持的值。
format跟swapchainImage保持一致即可
tiling 这里我们设置为VK_IMAGE_TILING_OPTIMAL
usage 表示图像用途,这里设置为VK_IMAGE_USAGE_TRANSIENT_ATTACHMENT_BIT | VK_IMAGE_USAGE_COLOR_ATTACHMENT_BIT 表明用作color attachment并且在需要使用时才分配内存空间
properties 为是要用于GPU读取,效率优先,因此设置为VK_MEMORY_PROPERTY_DEVICE_LOCAL_BIT
3)修改DepthImage支持多重采样
1 | void createDepthResources() { |
4)添加attachment到framebuffer和renderpass中
在创建framebuffer时,将color attachment加入到framebuffer资源中1
2
3
4
5std::array<VkImageView, 3> attachments = {
colorImageView,
depthImageView,
swapChainImageViews[i]
};
在renderpass里面添加attachment的引用1
2
3
4
5
6
7
8
9
10
11
12
13
14
15
16
17
18
19
20
21
22
23
24
25
26
27
28
29
30
31
32
33
34
35
36
37
38
39
40
41
42
43
44
45
46
47
48
49
50
51
52
53
54
55
56
57
58
59
60
61
62
63
64
65
66
67
68
69
70
71
72void createRenderPass() {
VkAttachmentDescription colorAttachment{};
colorAttachment.format = swapChainImageFormat;
colorAttachment.samples = msaaSamples;
colorAttachment.loadOp = VK_ATTACHMENT_LOAD_OP_CLEAR;
colorAttachment.storeOp = VK_ATTACHMENT_STORE_OP_STORE;
colorAttachment.stencilLoadOp = VK_ATTACHMENT_LOAD_OP_DONT_CARE;
colorAttachment.stencilStoreOp = VK_ATTACHMENT_STORE_OP_DONT_CARE;
colorAttachment.initialLayout = VK_IMAGE_LAYOUT_UNDEFINED;
colorAttachment.finalLayout = VK_IMAGE_LAYOUT_COLOR_ATTACHMENT_OPTIMAL;
VkAttachmentDescription depthAttachment{};
depthAttachment.format = findDepthFormat();
depthAttachment.samples = msaaSamples;
depthAttachment.loadOp = VK_ATTACHMENT_LOAD_OP_CLEAR;
depthAttachment.storeOp = VK_ATTACHMENT_STORE_OP_DONT_CARE;
depthAttachment.stencilLoadOp = VK_ATTACHMENT_LOAD_OP_DONT_CARE;
depthAttachment.stencilStoreOp = VK_ATTACHMENT_STORE_OP_DONT_CARE;
depthAttachment.initialLayout = VK_IMAGE_LAYOUT_UNDEFINED;
depthAttachment.finalLayout = VK_IMAGE_LAYOUT_DEPTH_STENCIL_ATTACHMENT_OPTIMAL;
VkAttachmentDescription colorAttachmentResolve{};
colorAttachmentResolve.format = swapChainImageFormat;
colorAttachmentResolve.samples = VK_SAMPLE_COUNT_1_BIT;
colorAttachmentResolve.loadOp = VK_ATTACHMENT_LOAD_OP_DONT_CARE;
colorAttachmentResolve.storeOp = VK_ATTACHMENT_STORE_OP_STORE;
colorAttachmentResolve.stencilLoadOp = VK_ATTACHMENT_LOAD_OP_DONT_CARE;
colorAttachmentResolve.stencilStoreOp = VK_ATTACHMENT_STORE_OP_DONT_CARE;
colorAttachmentResolve.initialLayout = VK_IMAGE_LAYOUT_UNDEFINED;
colorAttachmentResolve.finalLayout = VK_IMAGE_LAYOUT_PRESENT_SRC_KHR;
VkAttachmentReference colorAttachmentRef{};
colorAttachmentRef.attachment = 0;
colorAttachmentRef.layout = VK_IMAGE_LAYOUT_COLOR_ATTACHMENT_OPTIMAL;
VkAttachmentReference depthAttachmentRef{};
depthAttachmentRef.attachment = 1;
depthAttachmentRef.layout = VK_IMAGE_LAYOUT_DEPTH_STENCIL_ATTACHMENT_OPTIMAL;
VkAttachmentReference colorAttachmentResolveRef{};
colorAttachmentResolveRef.attachment = 2;
colorAttachmentResolveRef.layout = VK_IMAGE_LAYOUT_COLOR_ATTACHMENT_OPTIMAL;
VkSubpassDescription subpass{};
subpass.pipelineBindPoint = VK_PIPELINE_BIND_POINT_GRAPHICS;
subpass.colorAttachmentCount = 1;
subpass.pColorAttachments = &colorAttachmentRef;
subpass.pDepthStencilAttachment = &depthAttachmentRef;
subpass.pResolveAttachments = &colorAttachmentResolveRef;
VkSubpassDependency dependency{};
dependency.srcSubpass = VK_SUBPASS_EXTERNAL;
dependency.dstSubpass = 0;
dependency.srcStageMask = VK_PIPELINE_STAGE_COLOR_ATTACHMENT_OUTPUT_BIT;
dependency.srcAccessMask = 0;
dependency.dstStageMask = VK_PIPELINE_STAGE_COLOR_ATTACHMENT_OUTPUT_BIT;
dependency.dstAccessMask = VK_ACCESS_COLOR_ATTACHMENT_WRITE_BIT;
std::array<VkAttachmentDescription, 3> attachments = { colorAttachment, depthAttachment, colorAttachmentResolve };
VkRenderPassCreateInfo renderPassInfo{};
renderPassInfo.sType = VK_STRUCTURE_TYPE_RENDER_PASS_CREATE_INFO;
renderPassInfo.attachmentCount = static_cast<uint32_t>(attachments.size());
renderPassInfo.pAttachments = attachments.data();
renderPassInfo.subpassCount = 1;
renderPassInfo.pSubpasses = &subpass;
renderPassInfo.dependencyCount = 1;
renderPassInfo.pDependencies = &dependency;
if (vkCreateRenderPass(device, &renderPassInfo, nullptr, &renderPass) != VK_SUCCESS) {
throw std::runtime_error("failed to create render pass!");
}
}
下面我们来好好分析一个这个renderpass。
这个跟之前的渲染是有很大的不同的。之前的FrameBuffer里面只需要有两个attachment,如下所示:1
2
3
4std::array<VkImageView, 3> attachments = {
swapChainImageViews[i],
depthImageView,
};
这里swapChainImageViews[i]作为attachment[0],直接作为shader的输出写入的attachment。我们也能从他的colorAttachment.finalLayout = VK_IMAGE_LAYOUT_PRESENT_SRC_KHR;看出,他直接就用来输出到屏幕了。1
2
3
4
5
6
7
8
9
10
11
12
13
14
15
16
17
18
19
20
21
22
23
24
25
26
27
28
29
30
31
32
33VkAttachmentDescription colorAttachment{};
colorAttachment.format = swapChainImageFormat;
colorAttachment.samples = VK_SAMPLE_COUNT_1_BIT;
colorAttachment.loadOp = VK_ATTACHMENT_LOAD_OP_CLEAR;
colorAttachment.storeOp = VK_ATTACHMENT_STORE_OP_STORE;
colorAttachment.stencilLoadOp = VK_ATTACHMENT_LOAD_OP_DONT_CARE;
colorAttachment.stencilStoreOp = VK_ATTACHMENT_STORE_OP_DONT_CARE;
colorAttachment.initialLayout = VK_IMAGE_LAYOUT_UNDEFINED;
colorAttachment.finalLayout = VK_IMAGE_LAYOUT_PRESENT_SRC_KHR;
VkAttachmentDescription depthAttachment{};
depthAttachment.format = findDepthFormat();
depthAttachment.samples = VK_SAMPLE_COUNT_1_BIT;
depthAttachment.loadOp = VK_ATTACHMENT_LOAD_OP_CLEAR;
depthAttachment.storeOp = VK_ATTACHMENT_STORE_OP_DONT_CARE;
depthAttachment.stencilLoadOp = VK_ATTACHMENT_LOAD_OP_DONT_CARE;
depthAttachment.stencilStoreOp = VK_ATTACHMENT_STORE_OP_DONT_CARE;
depthAttachment.initialLayout = VK_IMAGE_LAYOUT_UNDEFINED;
depthAttachment.finalLayout = VK_IMAGE_LAYOUT_DEPTH_STENCIL_ATTACHMENT_OPTIMAL;
VkAttachmentReference colorAttachmentRef{};
colorAttachmentRef.attachment = 0;
colorAttachmentRef.layout = VK_IMAGE_LAYOUT_COLOR_ATTACHMENT_OPTIMAL;
VkAttachmentReference depthAttachmentRef{};
depthAttachmentRef.attachment = 1;
depthAttachmentRef.layout = VK_IMAGE_LAYOUT_DEPTH_STENCIL_ATTACHMENT_OPTIMAL;
VkSubpassDescription subpass{};
subpass.pipelineBindPoint = VK_PIPELINE_BIND_POINT_GRAPHICS;
subpass.colorAttachmentCount = 1;
subpass.pColorAttachments = &colorAttachmentRef;
subpass.pDepthStencilAttachment = &depthAttachmentRef;
但是在多重采样这里,我们的设置时不同的,首先我们的swapchainImage是attachment[2],它确实是用来做present的1
2
3
4
5
6
7
8
9VkAttachmentDescription colorAttachmentResolve{};
colorAttachmentResolve.format = swapChainImageFormat;
colorAttachmentResolve.samples = VK_SAMPLE_COUNT_1_BIT;
colorAttachmentResolve.loadOp = VK_ATTACHMENT_LOAD_OP_DONT_CARE;
colorAttachmentResolve.storeOp = VK_ATTACHMENT_STORE_OP_STORE;
colorAttachmentResolve.stencilLoadOp = VK_ATTACHMENT_LOAD_OP_DONT_CARE;
colorAttachmentResolve.stencilStoreOp = VK_ATTACHMENT_STORE_OP_DONT_CARE;
colorAttachmentResolve.initialLayout = VK_IMAGE_LAYOUT_UNDEFINED;
colorAttachmentResolve.finalLayout = VK_IMAGE_LAYOUT_PRESENT_SRC_KHR;
而fragment shader的输出到哪里了呢?就是我们新创建的colorImage.1
subpass.pColorAttachments = &colorAttachmentRef;
也就是说fragment shader的输出到了新创建的能进行多重采样的color attachment里面,然后vulkan执行多重采样,最终的输出结果位于subpass.pResolveAttachments指定的attachment中,也就是我们的swapchainImage。
这也就意味着多重采样实在fragment shader之后。
5) 修改pipeline支持多重采样
1 | VkPipelineMultisampleStateCreateInfo multisampling{}; |
6)最后在程序退出的时候,销毁资源
1 | vkDestroyImageView(device, colorImageView, nullptr); |